- China
- English
- Françai
- Español
- Deutsch
- Română
- العربية
- 한국어
- 日本語
- Italiano
- Português
- Gaeilge
- Dansk
- Čeština
- Русский
- Afrikaans
- Euskara
- Català
- Esperanto
- हिन्दी
- Ελληνικά
- Bahasa Melayu
- Polski
- Српски
- Kiswahili
- ภาษาไทย
- Tiếng Việt
- Türkçe
- Svenska
- Cymraeg
- Slovenčina
- Latviešu
- Malti
- Magyar
- Galego
- ગુજરાતી
- Eesti Keel
- বাংলা
- Shqip
- беларуская мова
- Nederlands
- Tagalog
- ქართული
- Íslenska
- Kreyòl Ayisyen
- Lietuvių
- Norsk
- slovenščina
- தமிழ்
- Українська
- ײִדיש
- اردو
- తెలుగు
- فارسی
- македонски
- ಕನ್ನಡ
- Bahasa Indonesia
- עברית
- Suomi
- Hrvatski
- Български
- Azerbaijani

Industry Application
Product Type
Step-by-step guide to hooking up an RV battery
Hooking up an RV battery might seem simple, but doing it wrong can cause big problems. Incorrect wiring can lead to undercharging or overcharging, which damages the battery and shortens its life. You could also face power issues or faster discharge cycles. Taking the right steps ensures safety and keeps your battery running longer.
Tools and Materials You’ll Need

Essential tools for hooking up an RV battery
Before you start, gather the right tools to make the process smooth and safe. Here’s a list of what you’ll need:
- Two 12-volt deep cycle batteries (or the type compatible with your RV).
- Battery cables long enough to connect the batteries to your RV.
- Wire cutters and strippers for adjusting cable lengths.
- A battery terminal cleaner to remove any corrosion.
- Battery terminal protectors to prevent future corrosion.
- A wrench or socket set for tightening connections.
- Safety goggles and gloves to protect yourself.
Having these tools ready will save you time and ensure you’re prepared for every step.
Recommended safety gear for working with batteries
Safety should always come first when working with RV batteries. Batteries contain acid and can emit harmful gases, so protecting yourself is crucial. Here’s what you’ll need:
- Protective gloves: These will keep your hands safe from acid and dirt.
- Safety goggles: Your eyes need protection from potential splashes or sparks.
- Multimeter: While optional, this tool helps check voltage and polarity to avoid mistakes.
- Cable ties: Use these to organize wires and keep your workspace neat.
Don’t skip the safety gear—it’s better to be over-prepared than to risk injury.
Choosing the right type of RV battery
Picking the right battery is just as important as installing it correctly. RV batteries come in different types, such as 12V, 6V, and 24V. The choice depends on your RV’s electrical system and how much power you need. Here are some factors to consider:
- Battery voltage and size: Ensure compatibility with your RV.
- Lifespan: Look for a battery with a long life to save money in the long run.
- Maintenance: Some batteries require regular upkeep, while others are maintenance-free.
- Charging options: Check if the battery supports your RV’s charging system.
- Warranty support: A good warranty can save you from unexpected costs.
Understanding these factors will help you choose a battery that fits your needs and keeps your RV running smoothly.
Safety Precautions Before You Begin
Importance of safety when working with RV batteries
When working with RV batteries, safety should always be your top priority. Batteries store a lot of energy, and mishandling them can lead to serious accidents. One major risk is short circuits. These can happen if tools or wires accidentally touch the wrong components, causing uncontrolled discharges. This can damage your battery or even start a fire. Another common hazard is improper charging. Overcharging can cause the battery to overheat, lose electrolytes, or even fail completely. On the other hand, undercharging weakens the battery over time, reducing its lifespan.
To stay safe, always handle batteries with care. Avoid rushing through the process, and double-check your connections before turning on the power. A little caution goes a long way in preventing accidents.
Preparing a safe workspace
Before hooking up an RV battery, set up a workspace that’s safe and organized. Choose a well-ventilated area to avoid the buildup of harmful gases. Keep the space dry and free from clutter. Make sure you have enough light to see what you’re doing clearly. Lay out all your tools and materials within easy reach, but keep metal objects like wrenches away from the battery terminals to prevent accidental shorts.
It’s also a good idea to have a fire extinguisher nearby, just in case. Taking these steps will help you work more efficiently and reduce the risk of accidents.
Common mistakes to avoid during installation
Mistakes during installation can lead to costly repairs or safety hazards. One common error is connecting the terminals incorrectly. Always connect the positive terminal first, followed by the negative. Reversing this order can cause sparks or damage your RV’s electrical system. Another mistake is skipping the step of cleaning the terminals. Corrosion can interfere with the connection, leading to poor performance.
Don’t forget to secure the battery properly. A loose battery can shift while driving, damaging wires or causing a short circuit. Finally, never work on the battery while the RV’s power is on. Turning off all power ensures your safety and protects your RV’s electrical components.
Step-by-Step Guide to Hooking Up an RV Battery
Step 1: Turn off all RV power and remove old batteries
Before you start hooking up an RV battery, you need to turn off all power sources. This step is crucial for your safety and to protect your RV’s electrical system. Follow these steps:
- Turn off all power sources connected to the batteries. This includes shore power, the generator, and any solar panels.
- Use a socket wrench or pliers to disconnect the negative (black) cable terminal from the battery.
- Next, disconnect the positive (red) cable terminal.
- Be careful not to touch both terminals at the same time. This can create sparks and pose a safety risk.
Once the power is off, remove the old batteries and set them aside for proper disposal.
Step 2: Identify positive and negative terminals
Take a close look at your new battery. You’ll see two terminals: one marked with a “+” (positive) and the other with a “-” (negative). The positive terminal is usually red, while the negative terminal is black. Double-check these markings to avoid any mix-ups during installation.
Step 3: Connect the positive terminal first
Now it’s time to start connecting the cables. Begin with the positive terminal. Attach the red cable to the “+” terminal and tighten it securely using a wrench. Starting with the positive terminal reduces the risk of short circuits.
Step 4: Connect the negative terminal
After the positive terminal is connected, move on to the negative terminal. Attach the black cable to the “-” terminal and tighten it. Make sure the connection is snug but not overly tight, as this could damage the terminal.
Step 5: Secure the battery in place
Once the cables are connected, secure the battery to prevent it from moving around. You can use a battery box designed for RVs or a truck bed toolbox. These options provide a safe and ventilated space for your battery. For added security, consider using battery locks to prevent theft.
Step 6: Test the battery connection
Finally, test the connection to ensure everything is working correctly. Turn on your RV’s power and check if the electrical systems are functioning as expected. If something seems off, double-check your connections and make sure the terminals are clean and tight.
By following these steps, you’ll have your RV battery installed safely and ready to go.
Understanding Series and Parallel Connections
What is a series connection and when to use it
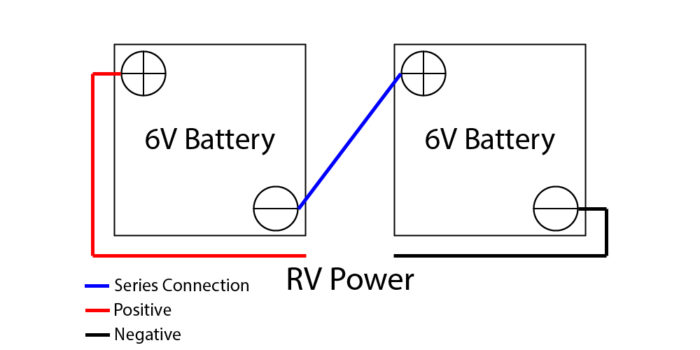
A series connection links batteries to increase their voltage. To do this, you connect the positive terminal of one battery to the negative terminal of another. The voltage adds up, but the capacity (amp hours) stays the same. For example, two 6V batteries wired in series create a 12V system, which is common in RVs. This setup is ideal when your RV requires higher voltage for its electrical system.
Using a series connection has some advantages. Pairing 6V deep cycle lead-acid batteries in series often provides greater capacity compared to a single 12V battery. This happens because 6V batteries usually have thicker lead plates, which offer higher amp-hour capacity. Plus, you can use lighter and less expensive wiring, and the system experiences reduced voltage drops.
What is a parallel connection and its benefits
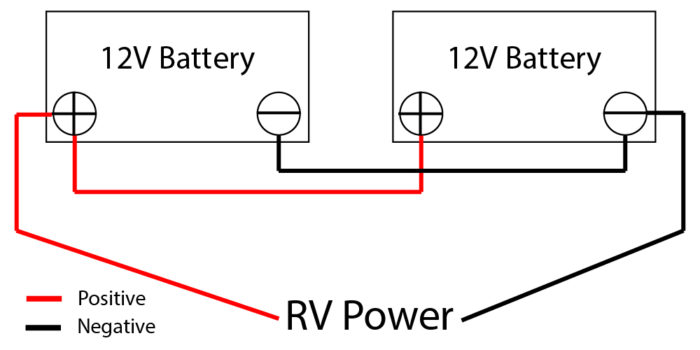
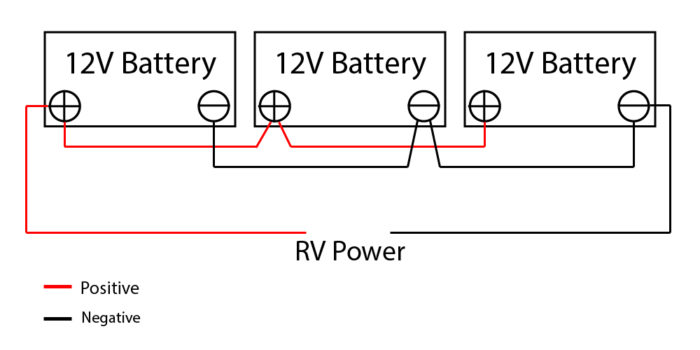
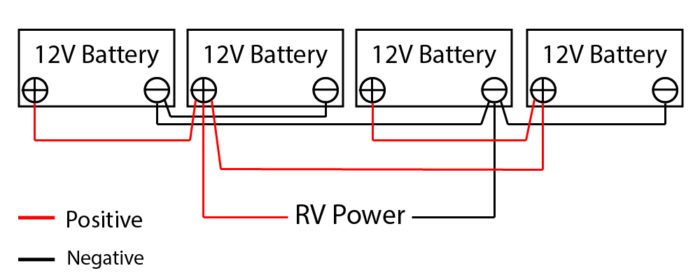
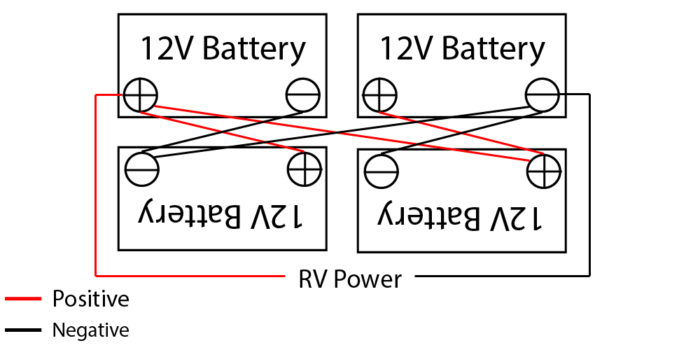
A parallel connection increases the battery bank’s capacity while keeping the voltage the same. To wire in parallel, you connect all the positive terminals together and all the negative terminals together. This setup is perfect if you want to maintain a 12V system but need more power for longer trips or heavier usage.
The benefits of parallel wiring are hard to ignore:
- Increased capacity: You get more amp hours, which means longer battery life.
- Redundancy: If one battery fails, the others still provide power.
- Scalability: You can add more batteries to expand your power supply.
This makes parallel connections a great choice for RVers who want reliability and flexibility.
Tips for wiring batteries in series or parallel
Wiring batteries correctly is crucial for safety and performance. Follow these tips to get it right:
- For parallel wiring: Connect all positive terminals together and all negative terminals together. This boosts capacity without changing voltage.
- For series wiring: Connect the positive terminal of one battery to the negative terminal of another. This doubles the voltage while keeping capacity the same.
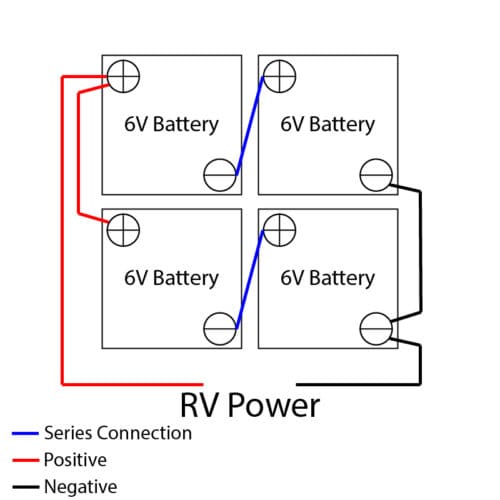
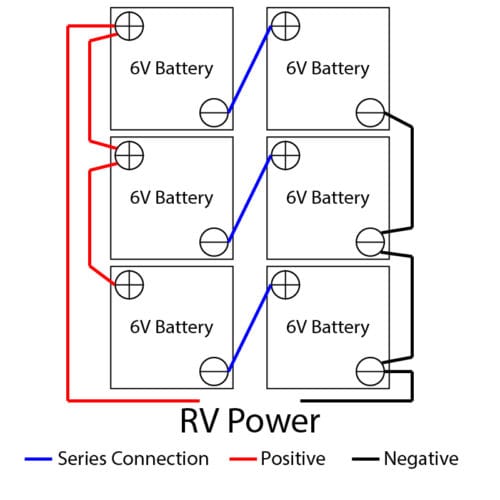
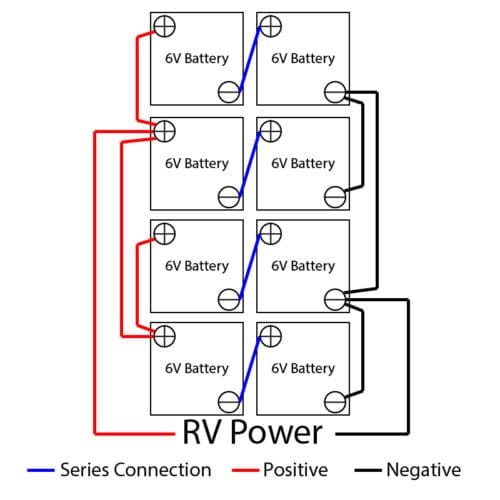
- For series-parallel wiring: Wire two sets of batteries in series first, then connect those sets in parallel. This increases both voltage and capacity.
Take your time and double-check your connections. A small mistake can lead to big problems, so it’s worth being thorough.
Pro Tip: Label your cables and terminals before starting. It’ll save you from confusion later on!
Best way to wire multiple 12V batteries in parallel
The Wrong Way To Parallel Connect 12 Volt Batteries

The Best Way To Parallel Wire Multiple 12V Batteries
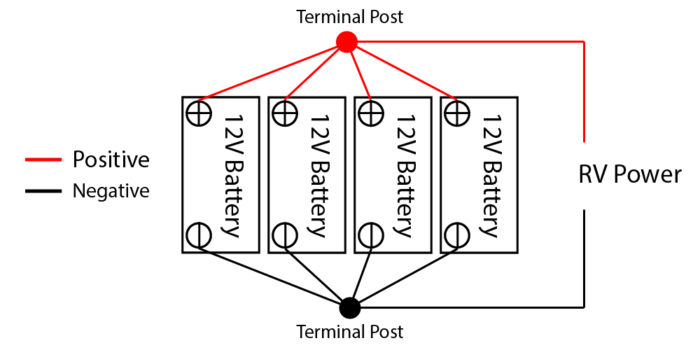
How To Wire 2 12V Batteries To An RV
How To Wire 3 12V Batteries To An RV
How To Wire 4 12V Batteries To An RV
If you can’t fit 4 batteries in a row in your RV battery storage space, you can connect them the Cross-Diagonal way in a block, as shown in the graphic below.
How To Wire 2 6V Batteries To An RV
How To Wire 4 6V Batteries To An RV
How To Wire 6 6V Batteries To An RV
How To Wire 8 6V Batteries To An RV
Testing and Final Inspection
How to test if the battery is functioning correctly
After hooking up an RV battery, you’ll want to confirm it’s working as expected. Testing the battery is simple if you have the right tools. Start with a multimeter to measure the voltage. Set it to DC voltage mode, then place the red probe on the positive terminal and the black probe on the negative terminal. A fully charged 12V battery should read around 12.6 to 12.8 volts. If the reading is lower, the battery might need charging or could have an issue.
For open-cell lead-acid batteries, use a hydrometer to check the electrolyte levels. This tool measures the specific gravity of the battery fluid, giving you an idea of its charge level. If you have a battery monitor, it can also help you track amp-hours (Ah) to assess the battery’s condition. Fully charge the battery, then let it sit for 24 hours without any load. Check the voltage again to see if it holds the charge.
Signs of a successful connection
A successful connection shows clear signs. Your RV’s electrical systems should power up without flickering or interruptions. Lights, appliances, and other devices should work as expected. The battery terminals should feel secure, with no loose cables or sparks when you turn on the power. If everything runs smoothly, you’ve done it right!
Troubleshooting issues after installation
If something doesn’t seem right, don’t panic. Start by double-checking the connections. Ensure the positive and negative terminals are correctly attached. Look for corrosion or dirt on the terminals, as these can disrupt the flow of electricity. Use a terminal cleaner if needed. If the battery still doesn’t work, test it again with a multimeter or hydrometer. A low voltage reading might mean the battery isn’t fully charged or has reached the end of its life. In that case, consider replacing it.
Pro Tip: Always keep a spare set of tools handy for quick fixes on the road.
Maintenance and Troubleshooting Tips
Best practices for maintaining your RV battery
Taking care of your RV battery is key to keeping it running smoothly for years. Here are some tips to help you maintain it:
- Regularly check the electrolyte levels if you’re using lead-acid batteries. Top them off with distilled water when needed.
- Avoid discharging AGM batteries below 50%. Deep discharges can shorten their lifespan.
- Store your battery in a dry, temperature-controlled spot to prevent wear and tear.
To keep your battery clean and corrosion-free, follow these steps:
- Disconnect the battery before cleaning.
- Use a cleaning solution to scrub the terminals and exterior.
- Fully charge the battery before storing it.
- Check the charge every 30 days during storage.
Installing a battery disconnect switch can also help prevent parasitic draw when your RV isn’t in use. These small steps can make a big difference in extending your battery’s life.
Identifying and fixing common battery issues
RV batteries can face a few common problems, but most are easy to fix. Here’s what to watch for:
- Dead batteries: Recharge them with a portable charger. Check for devices or systems that might be draining power.
- Undercharging: Charge your battery regularly to maintain its performance.
- Overcharging: Avoid leaving the battery connected to a charger for too long. Overcharging can cause damage and electrolyte loss.
- Aging batteries: Over time, batteries lose their ability to hold a charge. If this happens, it might be time for a replacement.
Improper use, like using a battery with the wrong capacity, can also lead to issues. Always ensure your battery matches your RV’s requirements.
When and how to replace your RV battery
Sometimes, even with the best care, a battery needs replacing. Here are some signs to look out for:
- The check engine light comes on, signaling a potential battery issue.
- You notice corrosion sounds or bad smells, which could mean a leak.
- The battery takes longer to recharge or doesn’t hold a charge well.
- Dimming headlights or reduced power in appliances indicate wear.
- Visible swelling, cracks, or holes in the battery show physical damage.
If your battery is over five years old, it’s worth considering a replacement. To replace it, follow the same steps you used for hooking up an RV battery. Disconnect the old one, clean the terminals, and install the new battery securely. Always test the connection before hitting the road.
Hooking up an RV battery doesn’t have to be intimidating. By following the steps carefully, you’ll ensure safety and efficiency. Regular maintenance, like keeping batteries clean and avoiding deep discharges, extends their lifespan. With the right tools and guidance, even beginners can handle this task confidently. You’ve got this—happy RVing!
FAQ
How do I know if my RV battery is fully charged?
Use a multimeter to check the voltage. A fully charged 12V battery reads 12.6-12.8 volts. For lead-acid batteries, check electrolyte levels with a hydrometer.
Can I mix different types of RV batteries?
No, you shouldn’t mix battery types. Different chemistries and capacities can cause uneven charging, reduced performance, or even damage to your RV’s electrical system.
How often should I check my RV battery?
Inspect your battery monthly. Look for corrosion, check the charge level, and ensure connections are secure. Regular checks help prevent unexpected issues on the road.
A Guide to Choosing the Best 48V Lithium Golf Cart Battery
Would it be worth investing in a 48V ...
10 Exciting Ways To Use Your 12V Lithium Batteries
Back in 2016 when BSLBATT first began designing what would become the first drop-in replacemen...
BSLBATT Battery Company Receives Bulk Orders from North American Customers
BSLBATT®, a China Forklift battery manufacturer specializing in the material handling indust...
Fun Find Friday: BSLBATT Battery is coming to another great LogiMAT 2022
MEET US! VETTER’S EXHIBITION YEAR 2022! LogiMAT in Stuttgart: SMART – SUSTAINABLE – SAF...
Looking for new Distributors and Dealers for BSL Lithium Batteries
BSLBATT battery is a fast-paced, high-growth (200% YoY ) hi-tech company that is leading the a...
BSLBATT to Participate at MODEX 2022 on March 28-31 in Atlanta, GA
BSLBATT is one of the largest developers, manufacturers, and integrators of lithium-ion batter...
What makes the BSLBATT the Superior Lithium Battery for your Motive Power needs?
Electric forklift and Floor Cleaning Machines owners who seek the ultimate performance will fi...


